If you have rented or want to rent the 2020 Thor Four Winds RV in the Northern Virginia area, this page is a digital guide and the link below is a text based guide on how to use it and get the most out of this amazing RV.
pre-trip preparation
- Review the Digital or text-based Renter’s guide (good news, you already are!)
- Respond to questions from the Fireside team (limited, but some insurance based questions are required from time to time)
- Tell me where you are going, this helps me research local maintenance shops in that area in case of an unexpected issue
- Coordinate special things like early p/u or later drop off
- Coordinate linens if you want me to provide them.
- Research the place you’re going to be RVing, check things like do they have water at every site or is it centralized, what’s the layout and how hard is it to maneuver, check in/out times, anything that will impact your ability to enjoy your trip.
- Coordinate water fill if you want me to do so.
- Confirm delivery time and provide delivery instructions (campsite #, special check-in steps, etc)
- Coordinate any special requirements
- Understand how to get assistance during your trip. My ‘business hours’ are between 8 am and 9 P.M. EST, if you try to reach out outside of those hours you will get a response the next morning. You have an on-call RV tech as part of your rental, they can be reached at 802-393-8324
pick up or receipt of rv
– Coordinate the pickup location and time if you haven’t already
– Pre-inspection: fill out the pre-inspection sheet:
– if you rented from Outdoorsy or the Fireside website
-if you rented from RVShare, fill out via the RVShare app
before driving (every time!)
- Walk-around: ensure you’ve disconnected shore and sewer, look beneath the RV for fluid leaks, loose components, unusual wear patterns on tires
- Turn on the main power switch on the Four Winds. It enables charging of the house batteries while driving, but doing this will ensure that the radio AND the rear-cameras are on before you drive anywhere.
- If you have passengers traveling in the living section of the RV, turn the generator on and allow it to begin powering the RV. It is ok to run the generator while you are traveling and it will allow for A/C or heat or running the TV while traveling in the living portion of the RV. Follow all safety rules when driving the RV if people are in the living section of the RV.
- Turn on the water pump so that you can use water systems (faucets, toilets, etc) in the RV.
- Ensure all external doors are closed and locked
- Disconnect all external connections (gray tank, shore power, etc). It’s so important I mentioned it twice.
- Check brakes: specifics in the video on the right
- Tires: pressure, uneven wear, discolored lug nuts (indicates loose), tread condition
- Lights: turn signals, running lights, brake lights, hazards
- Interior: lock cabinets and drawers, shut rooftop vents and fans, switch off water pump and heater, secure the bathroom door
site setup (skip if i’m delivering)
- Thank you RV Tips and Travels YouTube Channel for a great starting list and RV Blogger for a Class C list
- Before you pull into the site, walk the spot you’re given as well as the campsite itself, looking for potential problems (look both down and up)
- Check power from your site’s hookup using the surge protector (turn off breakers before plugging in).
- Confirm clear, running water from your water hookups.
- Unlock all doors and storage compartments.
- Turn on propane by turning on the propane on the exterior of the vehicle and turning on the LP gas switch on the RVs control board
- Check clearance (your RV fits both length and width (slides out) wise) and length of connection equipment (power cable, water, sewer, cable)
- Level side to side, then engage your trucks emergency brake. Use ____ level app to level when pulling in
- Place wheel chocks under wheels
- Connect shore power. (turn off breakers before plugging in).
- Lock EMS, padlock tongue.
- Open slide outs. The coach needs to be as level as possible whenever slides are extended, battery power needs to be strong, and the engine is turned off and the key out of the ignition, and you want to run the slideout FULLY out or FULLY in whenever you use the slides. Hold that button 2-3 seconds after the slideout is all the way out to allow the motors that run the slideouts to sync themselves and you will hear a sound when they do that. It may sound like a small reverse sound from the slideout sound.
- Turn on air/heat, power up fridge. INSIDE IS OPEN.
- Disinfect the water spigot
- Connect regulator, water hose, filter & switch valves to personal preference. (don’t turn on water yet)
- With water off, turn switch on water pump to desired water (city water or fresh tank fill)
- Turn on water & adjust water pressure regulator (40-50 psi).
- Connect cable TV coax line along with others
- Open stove hood vent.
- If using fresh water tank, power on water pump, wait for water pump to shut down (audible).
- (Optional) Check water heater for water (burp pressure valve).
- Turn on water heater power.
- Put on rubber gloves, connect sewer hose, put a few gallons of water in each tank along with treatment.
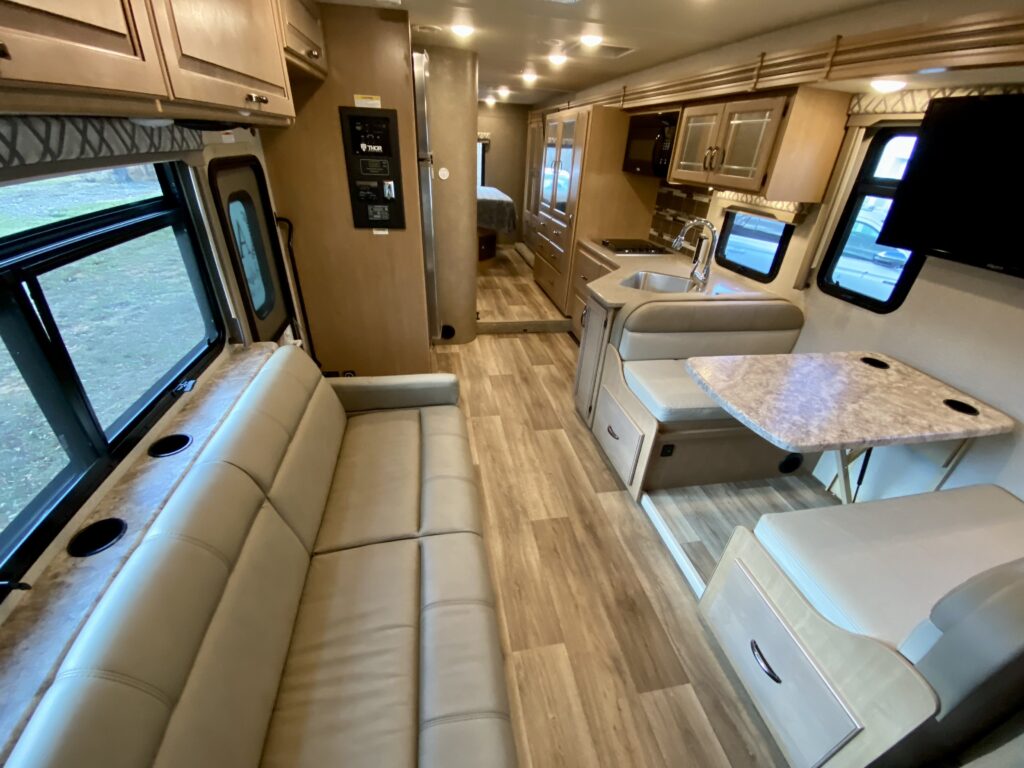
- Set up the dinette as a sleeping area if you need to. There is a lever under the dinette that allows you to lower it, reposition the cushions and make that area into a sleeping area.
- Convert the cab over area to a sleeping area if you want. You can pull the cushion back, attach the ladder to allow people to crawl up into the sleeping area. Note there is a TV in that area as well.
- You have 3 televisions throughout the RV, 1 at the cab over area, 1 in the main living area, and 1 outside of the RV. You can use the HDMI switch box connection above the couch area for connecting for movies either on each of the TVs simultaneously or separately. (is there a Winegard cable switch in this?)
- Check the CO2 and LP detectors and the smoke detector.
- Set up ground mat, tables, chairs lights, grill, etc.
- Get phone numbers & addresses of hospitals
- If using city water, you could put water in fresh tank for emergencies.
- Recheck, readjust your stabilizer jacks.
- Prep for nighttime by putting the shade (using velcro tabs) in the front portion of the cab area to block light while you sleep.
systems
water
Water:
– The Four Winds has a 40-gallon fresh water tank
– You can either fill the fresh water tank on site (and use your water pump) OR connect straight to city water and bypass the fresh water tank (you don’t need the pump)
– Connection information was covered in the Campsite Setup above
Sinks, Shower, and Toilet
– With your water hooked up (either filling the fresh water with the water pump on OR connecting to city water) simply turn on/off sinks as you would in your home. If you are using city water, the water bypasses your RV water tank and you do NOT need to keep the water pump on as the pressure from the city hookup will provide sufficient flow for your water.
– You already turned on propane in setup above, you can also check to ensure it’s on. In addition to ensuring the propane tank is turned to on, turn on LP Gas in the inside of the Four Winds from the control panel. You can turn on LP Gas AND the 110V switch beside it for the water heater, but the LP Gas is a MUST as it is much faster at heating water than 110V power is. The Four Winds has a tankless water heater that can be adjusted in a couple ways. You can adjust the flow rate of the water INTO the tankless water tank. You can adjust the control board (video below) and adjust before showering. Ensure you clean the drain often and use the hair catcher in the shower when you receive it to minimize slow drainage.
– RV toilets are not like house toilets. They require special toilet paper (in the rig when you arrived, if you need more ensure you purchase RV toilet paper-most Walmart’s have this) and a lot more water than you might be used to. Put water in the bowl before and after toilet activities. Watch the hyperlinked video for the word “RV Toilets” above if you’ve never used one before
Black and Gray Water
Black and Gray Water tanks can reach 2/3 full relatively quickly. Ensure this is something you check regularly to ensure nothing ‘backs up’ in either your shower or toilet.
– The Four Winds has a 28-gallon gray water tank that collects everything EXCEPT toilet waste. Use the gray water tank level on the control panel and dump gray water when the tanks reach 2/3 level (specific order below)
– The Four Winds has a 28-gallon black water tank and a black water tank panel on the same control board, it should also be dumped when it reaches 2/3 full. There is tank treatment below the bathroom sink.
– Dump black tank first, shut the black tank release, THEN Gray. SHUT both drains after dumping. Rubber gloves are in the crawl-space at the front of the rig.
electric
The 2020 Thor Four Winds includes 6 basic components:
– Shore power: A 30-amp four-wire setup
– Conversion: A converter that ‘converts’ AC power (from shore) to 12V DC power, charging your batteries. The converter is below the fuze box under the main bedroom sleeping area.
– 12V DC: A 12V DC power system (this is your ‘house’ batteries). MOST of your switches (on/off lights, etc) are run by 12V DC system, this system ‘rules’ all the others. The battery section is accessible by opening the entry step section of the RV.
– Inverter: this system changes the DC power from your batteries to power AC based systems, basically anything with a plug you recognize will leverage this system. This is particularly useful if you are boondocking and not able to get shore power.
Onboard Generator: The generator will not run with less than ¼ tank of fuel in the RV. Prime the generator if you haven’t used it in awhile by pressing and holding the stop button on the generator switch for 3-4 seconds. Then press the start button and the generator will begin to cycle on. Press the Start button for 3-4 seconds to ensure that the generator is running. 30-60 seconds later the microwave will beep and other items will turn on indicating that the generator has begun powering your RV. The hobbs meter to the left of the generator on off switch will tell you how many hours are available on the generator.
Solar: This allows you to charge your RVs batteries using solar power.
– The Four Winds breaker box is beneath the bed in the master bedroom. Troubleshooting plugs that don’t appear to work is often checking the GFCI to see if it needs to be reset. Spare fuzes are ________.
– Like the water system, the electrical system (batteries) have sensors to check the state of batteries. You must be OFF shore power to get an accurate reading of battery power.
Air Conditioner:
– The Four Winds has 2 11,000 BTU air conditioners. Obviously this is the most significant draw on the RV’s power supply. Your AC might run non-stop in really hot weather. That’s normal – RV air conditioners can only cool about 15-20 degrees below the outside temperature. Efficiency is key for the A/C, and the easiest way to keep your RV cool is to start the A/C at a time of day when it’s cooler. If you start the A/C when the cab is 100 degrees, the best it can do is lower it to 80-85 degrees (15-20 degrees below that).
– Good air flow can really cool an RV, so make sure your fans are optimizing the cooling of the rig.
– Thermostat Control is from the Coleman Mach thermostat.
Lights:
– the main light switch panel is near the entrance to the RV
– control specific light fixtures with individual switches
Kitchen, convection microwave, stove, fridge:
– the Four Winds has a residential-grade fridge. This is important to note because this fridge will cool faster than a typical RV fridge. There will be a control that you can turn on the power to the fridge, auto allows the fridge to run on gas or electric.
– the Four Winds has a convection microwave you can bake in it like an oven and this one is large enough you could cook a turkey in it
– the stove can be lit by first turning the burner you want to light to “light” and then turning the knob for starting (these are 2 separate knobs on the stove-top itself)
propane
The Four Winds uses propane for a number of things, some you might not even think of. Obviously the system uses propane for cooking and for heating the shower water (if you select the “gas” option on the control panel), but the system can also be used for operating the refrigerator and for operation of the furnace. We check propane levels between renters and propane is very efficient so a little goes a very long way. Ensure your first step in troubleshooting any propane related issue is to ensure that your propane is turned on, it’s one of the steps of setup but it is possible to miss it.
end of trip
This section is a mix of things you may do or I may do dependent upon if you’re towing or having me pick up after your trip is over. Stuff you will DEFINITELY do will be regular text, stuff my team or you may do will be italicized and bolded.
- Thanks again RV Tips and Travels for the starter list!
- (The day before leaving) Check weather forecast/pack outdoor items if weather is a potential
- Fuel up truck.
- Check tire pressure (TPMS).
- Pack chairs & table, ground mat, grill, family signs, and other outside misc. (DO NOT pack water, sewer & electric connections).
- (ONLY IF YOU HAVE A CAMPGROUND SITE SEWER CONNECTION) Put on rubber gloves.
- You MUST dump black and gray waste before my drivers will take the vehicle. If you don’t there will be a fee for dumping this for you.
- Open gray tank to confirm no leaks on connections or tubing, close gray tank valve, then completely dump black tank.
- (Optional) Rinse black tank in front of RV.
- Close black tank valve in front of RV after empty, add water back to tank (about 10% of capacity), plus your preferred treatment. Treatment is under the sink.
- Disconnect sewer hose and store it in the rear bumper.
- Discard gloves & wash hands.
- Disconnect fresh water hoses & accessories (if you don’t need any more water in the RV).
- Open fresh water tank drain and drain.
- Close all windows & shades.
- Latch interior doors & open spring loaded shower doors.
- Secure the TV.
- Close roof vents & turn off ceiling fans.
- Clear all countertops & collapse countertop extensions.
- Secure any free standing furniture.
- Oven and stove top burner knobs turned off.
- Collapse or reposition any roof antennas for travel.Close all cabinets & drawers.
- Clear shower shelves & put shower head on floor.
- Take out the trash
- Turn off thermostat, fridge, radio, water pump, water heater, all electronic & gas devices. Turn off exterior lights.
- Turn off propane.
- Close stove hood vent.
- Ensure nothing is on the top of the slide.
- Here down will be the joint inspection with the renter and the driver.
- Conduct interior walk around and document condition.
- Close slide
- Close ALL doors.
- Raise stabilizers.
- Conduct exterior walk around and document the state of the RV:
– walk around with my drivers
– confirm that water systems are dumped - Driver only: Sign return inspection if you are able before leaving the campsite
- Store blocks
- Turn off breaker, disconnect and store shore power cord & surge protector/EMS.
- Store any cable or satellite lines.
- Connect trailer power cord to truck.
- Remove chocks & store.
- Pull truck off leveling blocks & pack.
- Complete walk around: look around & under RV, store any loose items.
- Lock all exterior doors
- Ensure the main power switch is on for engagement of the back up camera.
- Turn lights to “manual on.” Turn on hazards and check trailer lights.
- (ONLY IF DRIVING TO DUMP STATION) Dump tanks as outlined earlier.
- Head home.
I know the video below is of a Class A.
all the videos in a list


How Do I Hookup My RV To Fresh Water? | RV Quick Tips - Ep. 2
RV tankless water heaters, the right way to use them!
How To Use Your Thor Motor Coach Class C RV: Four Winds, Chateau, Quantum, Freedom Elite & Daybreak